
Showing posts with label tutorials. Show all posts
Showing posts with label tutorials. Show all posts
Monday, January 30, 2012

Wednesday, January 18, 2012
Make Your Own Disco Balls

What more festive way to adorn your reception than with disco ball accents! They send a fun celebration message to your guests and will sparkle in the light. You can make tiny balls and attach to escort cards, use them on favor boxes, or even make large balls to hang from ceiling

These disco balls were inspired by a pricey and gorgeous ornament I found this winter and I’m thrilled to have found a cheap way to make them in mass! Invite your bridesmaids over for an evening of wine and gluing and bust out a large pile of these in no time.
Materials
- Styrofoam balls in sizes of your choice,
- Clear drying tacky glue
- Ornament tops or metals loops for tying/hanging,
- Lots of 1/4, 1/2, or 1 inch craft mirrors (purchase them cheaply online in bulk or at your local craft store).

How To:
Stick your ornament top or metal loop right into the ball, lift it just a bit and begin gluing the mirrors around in a circle underneath. Once you have two lines put a small amount of glue on your ornament topper and stick it down.

The ends might never be perfect, don’t fret about that and just glue in a circle. You will see some styrofoam between the mirrors. The end effect is so dazzling that your guests will never notice this.

 I am usually a hot glue lover, but for this project stick with tacky glue as the small pieces will really show any left over hot glue lines.
Allow time to dry.
Thread ribbon through the ornament topper and tie onto favor boxes for a festive and celebratory touch! Or, use them as escort cards, centerpiece adornments or hanging décor!
Tuesday, January 10, 2012
Wedding Place Cards
I love it when the most mundane items can be transformed into something useful and practical. Cake icing tips are one of those items! They come in all different shapes and sizes and can be transformed to coordinate with your wedding with just a coat of spray paint. Add your place card, and this project takes about 5 seconds to complete, shopping time not included. To add an extra element, gather up colorful glass containers and add some simple flowers. I bought spray roses, stock, hyacinth, and hydrangea all from Trader Joe’s.

Supplies: Cake icing tips (can be found at your local Michael’s or cake supply store), spray paint, paper and pen.
Step 1: Spray paint your cake icing tip and let dry.
Step 2: Write name on paper with a pen or paint marker.
Done!
Supplies: Cake icing tips (can be found at your local Michael’s or cake supply store), spray paint, paper and pen.
Step 1: Spray paint your cake icing tip and let dry.
Step 2: Write name on paper with a pen or paint marker.
Done!
Sunday, October 30, 2011
Glitter Candles

Materials and Tools:
pillar or taper candles
Candle DecoPaint (by Marvy Uchida)
ultra-fine glitter
manila folder
Steps:
- Use the Candle DecoPaint to add Halloween-themed drawings to the pillar candles. Crazy stripes also look spooky.
- While the candle DecoPaint is still wet, sprinkle ultra-fine glitter over areas that you wish to highlight.
- Work over a manila folder so that you can easily funnel any stray glitter back into its canister.
Allow the candle to dry for 24 hours.
Thursday, October 20, 2011
Spiced Pumpkin Brittle

Spiced Pumpkin Seed Brittle
Yield: About 6-8 servings
1 cup sugar
3/4 cup hulled pumpkin seeds (also called pepitas; feel free to use any tree nut you’d prefer)
2 tablespoons unsalted butter
1/2 teaspoon ground cinnamon
1/4 teaspoon chipotle chile powder
1/4 teaspoon ground ginger
1/4 teaspoon sea salt
1/4 teaspoon baking powder
-
Candy thermometer
(For the Pistachio Sesame brittle, use 2 tablespoons sesame seeds and 3/4 cup pistachios.)
Grease a 9×12 baking sheet with butter and set aside.
In a small, heavy-bottomed pot over a medium low flame, melt the butter with the cinnamon, chile powder, ginger and sea salt. Add the sugar and stir thoroughly. Continue to stir sugar almost constantly to prevent burning. When the temperature of the mixture reaches 280 degrees, add the nuts. Continue stirring almost constantly.
The sugar will slowly begin to clump and melt. Keep stirring! At 300 degrees, remove from heat and quicky stir in the baking powder.
Working quickly, pour the brittle onto the greased baking pan, spreading with a spatula. Let stand until thoroughly cooled and hardened. (You can expedite this by putting it into the fridge.)
Monday, October 17, 2011
Pumpkin Party Cooler

Want your own cool pumpkin cooler? Follow these simple instructions and you can have one of your very own. :)
What you'll need:
- Pumpkin
- plastic/glass bowl ( must be slightly smaller than pumpkin)
- ice
- drinks
- pumpkin carving tools ( or whatever you use when carving)
- newspapers ( to lay down underneath your pumpkin)
- First take off about a quarter or so of your pumpkin off ( as shown in the picture). Now comes the icky part, scoop out all the pumpkins innards and make sure it's nice and clean inside when done!
- Now that your pumpkins nice and clean take your bowl and place inside.
- Fill with ice and your choice of drinks (I reccomend cream sodas) for a creative cooler for your party!
Spider Garland

- Cut a 5"W x 18"L strip from a 12"W x 18"L sheet of construction paper. Measure in three inches from one of the five-inch ends and mark. From there, measure and mark four more times.
- Fold paper at the first mark. Then flip over and fold again at the next mark. Keep flipping and folding, making an accordion shape.
- Print the template of your choice and cut as directed.
- Center it atop the folded paper, and trace around the shape with a pencil.
- Carefully cut out the shape, going through all the layers of folded paper, and unfold to reveal. To create a longer row, repeat steps and adhere garlands together with tacky glue.
Minor Tips
Okay so before my next tutorial I thought I'd post a few things for those wanting to learn to cook various things. Some of these tips can be used across a wide spectrum of dishes. All of these I found out on my own, so I hope it works for you!
- Take about a teaspoon (eventually you'll be able to just scoop out this much with your hand like me) of flour and sprinkle over any kind of pan your baking things with. This works best with pizza, cakes, etc. This will ensure nothing ever sticks.
- When cooking any type of pasta add a teaspoon or two of cooking oil to the water. It adds taste and keeps your noodles from sticking to your pot and together.
- When baking dishes ( mac & cheese, lasanga, etc) always coat your pain with aluminum foil, its keeps everything relatively clean and keeps food from sticking to your pans.
- Run water over freshly cut onions and peppers to get rid of the majority of the smell and to keep you from crying.
- Want meat to cook quicker on the stove top? Cover with a glass lid. Takes half the time and locks in flavor.
Thursday, October 13, 2011
Smore Pops!
So I saw a picture of these online and just had to make a small tutorial for you guys that everyone in the family can do and is easy to boot! Don't these just look delicious?
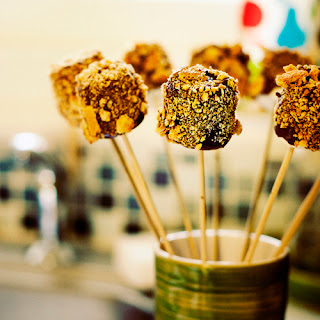 What you'll need:
Next skewer you some marshmallows and in a small bowl crush up some graham crackers until you've got nothing but tiny pieces and crumbs and set out some wax paper.
Now that you have all of this done let's get to the next part. Take your marshmallows and dip them in the chocolate, make sure to get them nice and covered. Make sure you let any excess chocolate drip back into your pan. Then take it and roll it in some graham crackers and set it on wax paper to cool. Rinse and repeat until you have enough. Place in the fridge to cool quicker.
And that's it, now you've got some yummy treats for that Halloween party you've been planning.

- marshmallows
- graham crackers
- kabob sticks
- chocolate ( chips, disks, whichever you prefer)
- wax paper
Next skewer you some marshmallows and in a small bowl crush up some graham crackers until you've got nothing but tiny pieces and crumbs and set out some wax paper.
Now that you have all of this done let's get to the next part. Take your marshmallows and dip them in the chocolate, make sure to get them nice and covered. Make sure you let any excess chocolate drip back into your pan. Then take it and roll it in some graham crackers and set it on wax paper to cool. Rinse and repeat until you have enough. Place in the fridge to cool quicker.
And that's it, now you've got some yummy treats for that Halloween party you've been planning.
Subscribe to:
Posts (Atom)